

In 2017, the Government of India simplified the tax structure by replacing various indirect taxes like excise duty, VAT, and service tax with a single indirect tax known as the Goods and Services Tax (GST).
To facilitate taxpayers, the government introduced an online GST portal for easy submission of GST returns, claiming refunds, and responding to notices without visiting tax offices. This guide will help you understand the GST login portal, claim GST refunds, register for GST online, check GST refund status, and monitor tax submission status.
The first step to avail of all such facilities is to log in to the government’s official GST Portal.
Services that can be accessed by taxpayers through the GST Portal
The facilities that can be accessed through the GST Portal include:
- GST registration
- GST payment
- Tracking GST payment status online
- Filing of GST Returns including Reconciliation Statement (GSTR-9C)
- Claiming GST refunds for excess payment
- Identifying and engaging a GST practitioner
- Cancelling GST registration
- Submitting GST-related grievances
In addition to the above facilities, numerous other services can be availed by taxpayers through the GST portal. Using the GST login portal, taxpayers can take certain actions such as GST registration, GST return filing, payment of taxes, application for a refund, etc.
Related Article: GST Certificate Download Online
How to register on the GST Portal?
Any business that has a turnover exceeding Rs 20 lakhs annually for the sale of goods, needs to register for GST. You can register by visiting the official GST portal at www.gst.gov.in. The steps you need to follow for GST registration include:
The Application form has two parts – Part A and Part B.
New Registration on GST Portal:
- Visit the GST portal
- In the Services Section, click on Registration and then select new registration
- A New Registration form will appear in front of you
- Enter the required details including your personal information, legal name of the business, PAN number, email address, and mobile number.
- An OTP will be sent to your mobile number which you have mentioned in the form
- Enter the captcha text & click the Proceed button.
- On clicking proceed, the GST Portal displays all the GSTINs / Provisional IDs / UINs / GSTP IDs mapped to the same PAN across India. Click the Proceed button. Click the Download button to download the available registration details in PDF format.
- The OTP Verification page is displayed. In the Mobile OTP section, enter the OTP you received on your mobile number. Remember the OTP will be valid for 10 minutes.
- In the Email OTP field, enter the OTP you received on your email address. OTP is valid only for 10 minutes.
- Click proceed button
- The system-generated Temporary Reference Number (TRN) is displayed.
- Click the PROCEED button. You will get the TRN acknowledgment information via mail as well as your mobile number.
Part B of Registration Application:
13. In the Temporary Reference Number (TRN) field, enter the TRN generated and enter the captcha text as shown on the screen, and click the Proceed button.
14. The Verify OTP page will appear on screen. You will receive the same Mobile OTP and Email OTP.
Note: These OTPs are different from the OTPs sent in the previous step.
15. In the Mobile/Email OTP field, enter the OTP received on your mobile number and email address. OTP is valid only for 10 minutes,
16. Click the Proceed button.
17. The My Saved Application page is displayed. Under the Action column, click the Edit icon
18. The Registration Application form with various tabs is displayed. On the top of the page, there are ten tabs as Business Details, Promoter/Partners, Authorized Signatory, Authorized Representative, Principal Place of Business, Additional Places of Business, Goods and Services, State Specific Information, Aadhaar Authentication and Verification. Click each tab to enter the details.
19. Once all the details are filled in, move to the Verification page. Tick on the declaration and submit the application using any of the following ways: Companies and LLPs must submit an application using DSC Using e-Sign – OTP will be sent to the Aadhaar registered number Using EVC – OTP will be sent to the registered mobile.
20. A message is displayed on the successful application and the Application Reference Number (ARN) is sent to registered email and mobile.
Related Article: What is GST Composition Scheme?
How to check GST registration status online on the GST portal?
Usually, a GST registration application is processed after 15 days of submission. However, individuals can check their GST registration status online on the GST portal.
There are two ways to check GST Application Status or GST Registration Status – before logging into the GST portal or without logging into the GST portal.
Tracking GST registration application status online before login:
Step 1 – Visit the GST Portal and go to ‘Services’ > ‘Registration’ > ‘Track Application Status’.

Step 2 – Select “Registration” from the drop-down.
Step 3 – Enter the ARN or SRN received for the GST Registration application on your email ID. Also, enter the Captcha code and click on SEARCH.

Step 4: You can view your GST registration status on the screen.
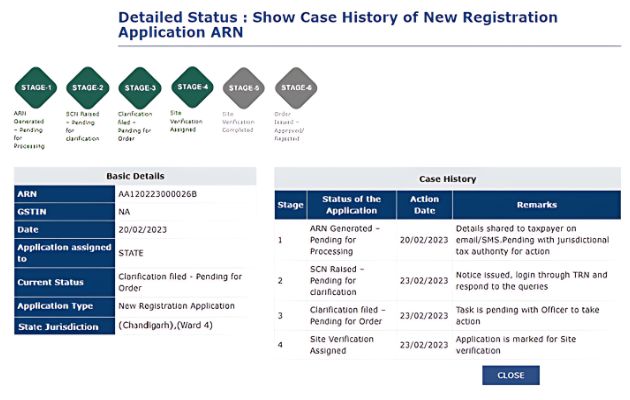
Check the status of your GST registration application online and take appropriate action based on the ARN status.
Tracking GST registration application status after login:
Certain taxpayers can track their GST application status after logging into the GST portal using the ARN or submission period. Note that this service is not available for first-time GST registration applicants.
Step 1: Log into the GST portal and go to Services > Track Application Status option.
Step 2: Choose the option from drop-down against the Module as Registration.
Step 3: You may also know the application status from the ARN or SRN.
Step 4: Click on the text “download” hyperlink to get the acknowledgement.
GST Refund:
Taxpayers usually claim a GST refund for the excess cash balance deposited in the electronic cash ledger. Two other situations when individuals claim GST refund include – tax paid by mistake or the accumulated Input Tax Credit (ITC) which couldn’t be utilized for tax payments due to zero-rated sales or inverted tax structure.
The GST refund claim process requires the taxpayer to follow specific steps and submit documents and declaration if required, to the GST authorities.
How to claim GST refund of the excess amount available in the Electronic Cash ledger?
- Login to the GST portal
- Navigate to Services > Refunds > Application for Refund option.
- Select the reason for the Refund as ‘Refund on account of excess balance in cash ledger’. File refund application in GST RFD-01.
- The amount available in the Electronic Cash Ledger would be auto-populated in the refund application in a matrix.
- Mention the amount of refund to be claimed in GST RFD-01 in the refund claimed table and file the form.
Documents required while filing refund application on account of excess payment of tax?
The documents you need to upload while filing a refund application include Form RFD-01, as notified under CGST Rules or Circulars issued in the matter and other such documents the refund sanctioning authority may require.
Note: Taxpayers have the option to upload 10 documents with the refund application, of sizes up to 5 MB each. Any supporting document can be uploaded by the taxpayer if required.
Related Article: Types of GST Returns and Their Due Dates
Tracking status of an application for a refund:
To track your filed application, navigate to Services > Refunds > Track Application Status option.
Track GST Refund Status Online:
- Visit the GST Portal.
- Login to your account with valid credentials.
- Go to ‘Services’ -> ‘Refunds’ -> ‘Track Application Status’.
- Select the relevant financial year for which the refund application was filed, or enter the ARN of the refund application. The search results will be displayed.
- Scroll to the right to view the ‘Payment Advice Status’. In the event the bank account validation has failed, there is an option to update the bank account by clicking on the button ‘Update Bank Account’ under Bank Validation Status.
- A page will be displayed to update the bank account details. After selecting the relevant account number, click on ‘Proceed’. A warning will pop up on the screen asking if you are sure to update the bank account for that particular ARN, click on ‘Proceed’.
- Click on the check-box in the declaration field, select the authorised signatory, and proceed to file with DSC/EVC. An OTP will be sent to the registered mobile number which needs to be entered to confirm filing.
- A message will pop up at the top of the screen saying that the bank account has been updated successfully.
FAQs
Q.1 How to obtain a GST login ID and password?
One can get a GST login ID and password by applying for GST registration and providing important details such as business name, PAN, phone number, and personal details like name of authorized person, address details, and other supporting documents. Upon the successful filing of the GST application, ID and password for GST login will be given.
Q.2 Who should file GST return?
All dealers and business owners who have registered under the GST system are required to file GST returns. Regular enterprises with an annual aggregate turnover of over Rs. 5 crore (as well as taxpayers who have not chosen to participate in the QRMP program) are required by the GST regime to file one annual return in addition to two monthly returns. This equates to twenty-five returns annually.
Q.3 Is there any fee or penalty for late filing of GST return?
Late filing of GST returns will have a cascading effect leading to heavy fines and penalties.